WebFramework/[FastAPI]
-
[FastAPI] Gunicorn threads 옵션 2024.11.06
-
 [FastAPI] SocketIO Admin UI 2024.01.25
 -
 [FastAPI] room 기능 구현 및 worker간 공유 (RabbitMQ) 2024.01.24
 -
 [FastAPI] SocketIO 마운트해서 사용하기 2024.01.24
 -
[FastAPI] BackgroundTasks, Celery 2024.01.09
-
[FastAPI] 중첩된 JSON 모델(Nested JSON Models) 사용 2023.09.25
-
[FastAPI] SQLAlchemy 요소 2023.08.08
-
 [wsl] 파이썬 가상환경 진입 bash 사용 2023.03.10
[FastAPI] Gunicorn threads 옵션
CMD="gunicorn \
    -w $WORKERS \
    -k uvicorn.workers.UvicornWorker \
    -b 0.0.0.0:$PORT \
    --timeout $TIMEOUT_SECONDS \
    --threads $THREADS \
    callisto.server:app"
threads 옵션을 사용하는 경우 (-w 2, --threads 4)
[Worker 1 (프로세스)]
├── Thread 1: FastAPI 이벤트 루프 (비동기 요청 처리)  <-- 항상 1개!
├── Thread 2: FastAPI 동기 요청 처리 (스레드 풀)
├── Thread 3: FastAPI 동기 요청 처리 (스레드 풀)
├── Thread 4: FastAPI 동기 요청 처리 (스레드 풀)
└── (추가적인 백그라운드 스레드, 예: threading.Thread())

[Worker 2 (프로세스)]
├── Thread 1: FastAPI 이벤트 루프 (비동기 요청 처리)  <-- 항상 1개!
├── Thread 2: FastAPI 동기 요청 처리 (스레드 풀)
├── Thread 3: FastAPI 동기 요청 처리 (스레드 풀)
├── Thread 4: FastAPI 동기 요청 처리 (스레드 풀)
└── (추가적인 백그라운드 스레드, 예: threading.Thread())
실제 동작 예시
# 비동기 엔드포인트 - 이벤트 루프에서 처리
@app.get("/async")
async def async_endpoint():
    await some_io_operation()  # 이벤트 루프에서 처리

# 동기 엔드포인트 - 스레드 풀에서 처리
@app.get("/sync")
def sync_endpoint():
    time.sleep(1)  # 스레드 풀의 스레드에서 처리
threads 옵션은 주로 동기 작업을 처리하기 위한 것
비동기 작업은 여전히 단일 스레드의 이벤트 루프에서 처리
FastAPI에서 async로 정의된 엔드포인트는 threads 옵션과 관계없이 비동기로 처리
1. GIL과 I/O 바운드 작업의 관계
GIL이 있더라도 I/O 바운드 작업에서는 멀티스레딩이 효과적
def sync_endpoint():
    # I/O 작업 (예: DB 쿼리, 파일 읽기, HTTP 요청)
    time.sleep(1)  # I/O 작업을 시뮬레이션
    return "done"
- Thread A가 I/O 작업을 시작하며 GIL을 해제
- 그 동안 Thread B가 GIL을 획득하여 다른 I/O 작업 수행
2. Gunicorn threads 옵션
# 시나리오 1: I/O 바운드 동기 작업
@app.get("/sync")
def sync_endpoint():
    time.sleep(1)  # I/O 작업
    return {"result": "done"}

# 시나리오 2: CPU 바운드 동기 작업
@app.get("/cpu")
def cpu_endpoint():
    result = 0
    for i in range(1000000):  # CPU 집중 작업
        result += i
    return {"result": result}
- I/O 바운드 작업(시나리오1) : threads 옵션이 효과적
- CPI 바운드 작업(시나리오2): threads 옵션이 거의 효과 없음
3. async vs threads 선택 기준
# 비동기 방식
@app.get("/async")
async def async_endpoint():
    await asyncio.sleep(1)
    return {"result": "done"}

# 스레드 방식
@app.get("/threaded")
def threaded_endpoint():
    time.sleep(1)
    return {"result": "done"}
- 이미 async/await로 작성된 라이브러리 사용시
: async 엔드포인트
- 동기식 라이브러리만 있는 경우
: thread 사용
4. 권장 설정 방법
# 권장 설정
gunicorn -w 2 -k uvicorn.workers.UvicornWorker --threads 4 app:app
- async 엔드포인트 : 이벤트 루프에서 효율적으로 처리
- 동기 엔드포인트 : 스레드 풀에서 처리
- 적절한 스레드 수 : CPU 코어 수 * 2~4
* async가 있더라도 threads 옵션을 1로 두지 않는게 좋음
: 동기 코드로 처리해야 할 수 있기 때문
* 무작정 threads 옵션을 늘리는 것은 좋지 않음
: 컨텍스트 스위칭 오버헤드 증가
* 실제 워크로드에 따라 적절한 threads 설정 필요
'WebFramework > [FastAPI]' 카테고리의 다른 글
| [FastAPI] SocketIO Admin UI (0) | 2024.01.25 |
|---|---|
| [FastAPI] room 기능 구현 및 worker간 공유 (RabbitMQ) (0) | 2024.01.24 |
| [FastAPI] SocketIO 마운트해서 사용하기 (0) | 2024.01.24 |
| [FastAPI] BackgroundTasks, Celery (0) | 2024.01.09 |
| [FastAPI] 중첩된 JSON 모델(Nested JSON Models) 사용 (0) | 2023.09.25 |
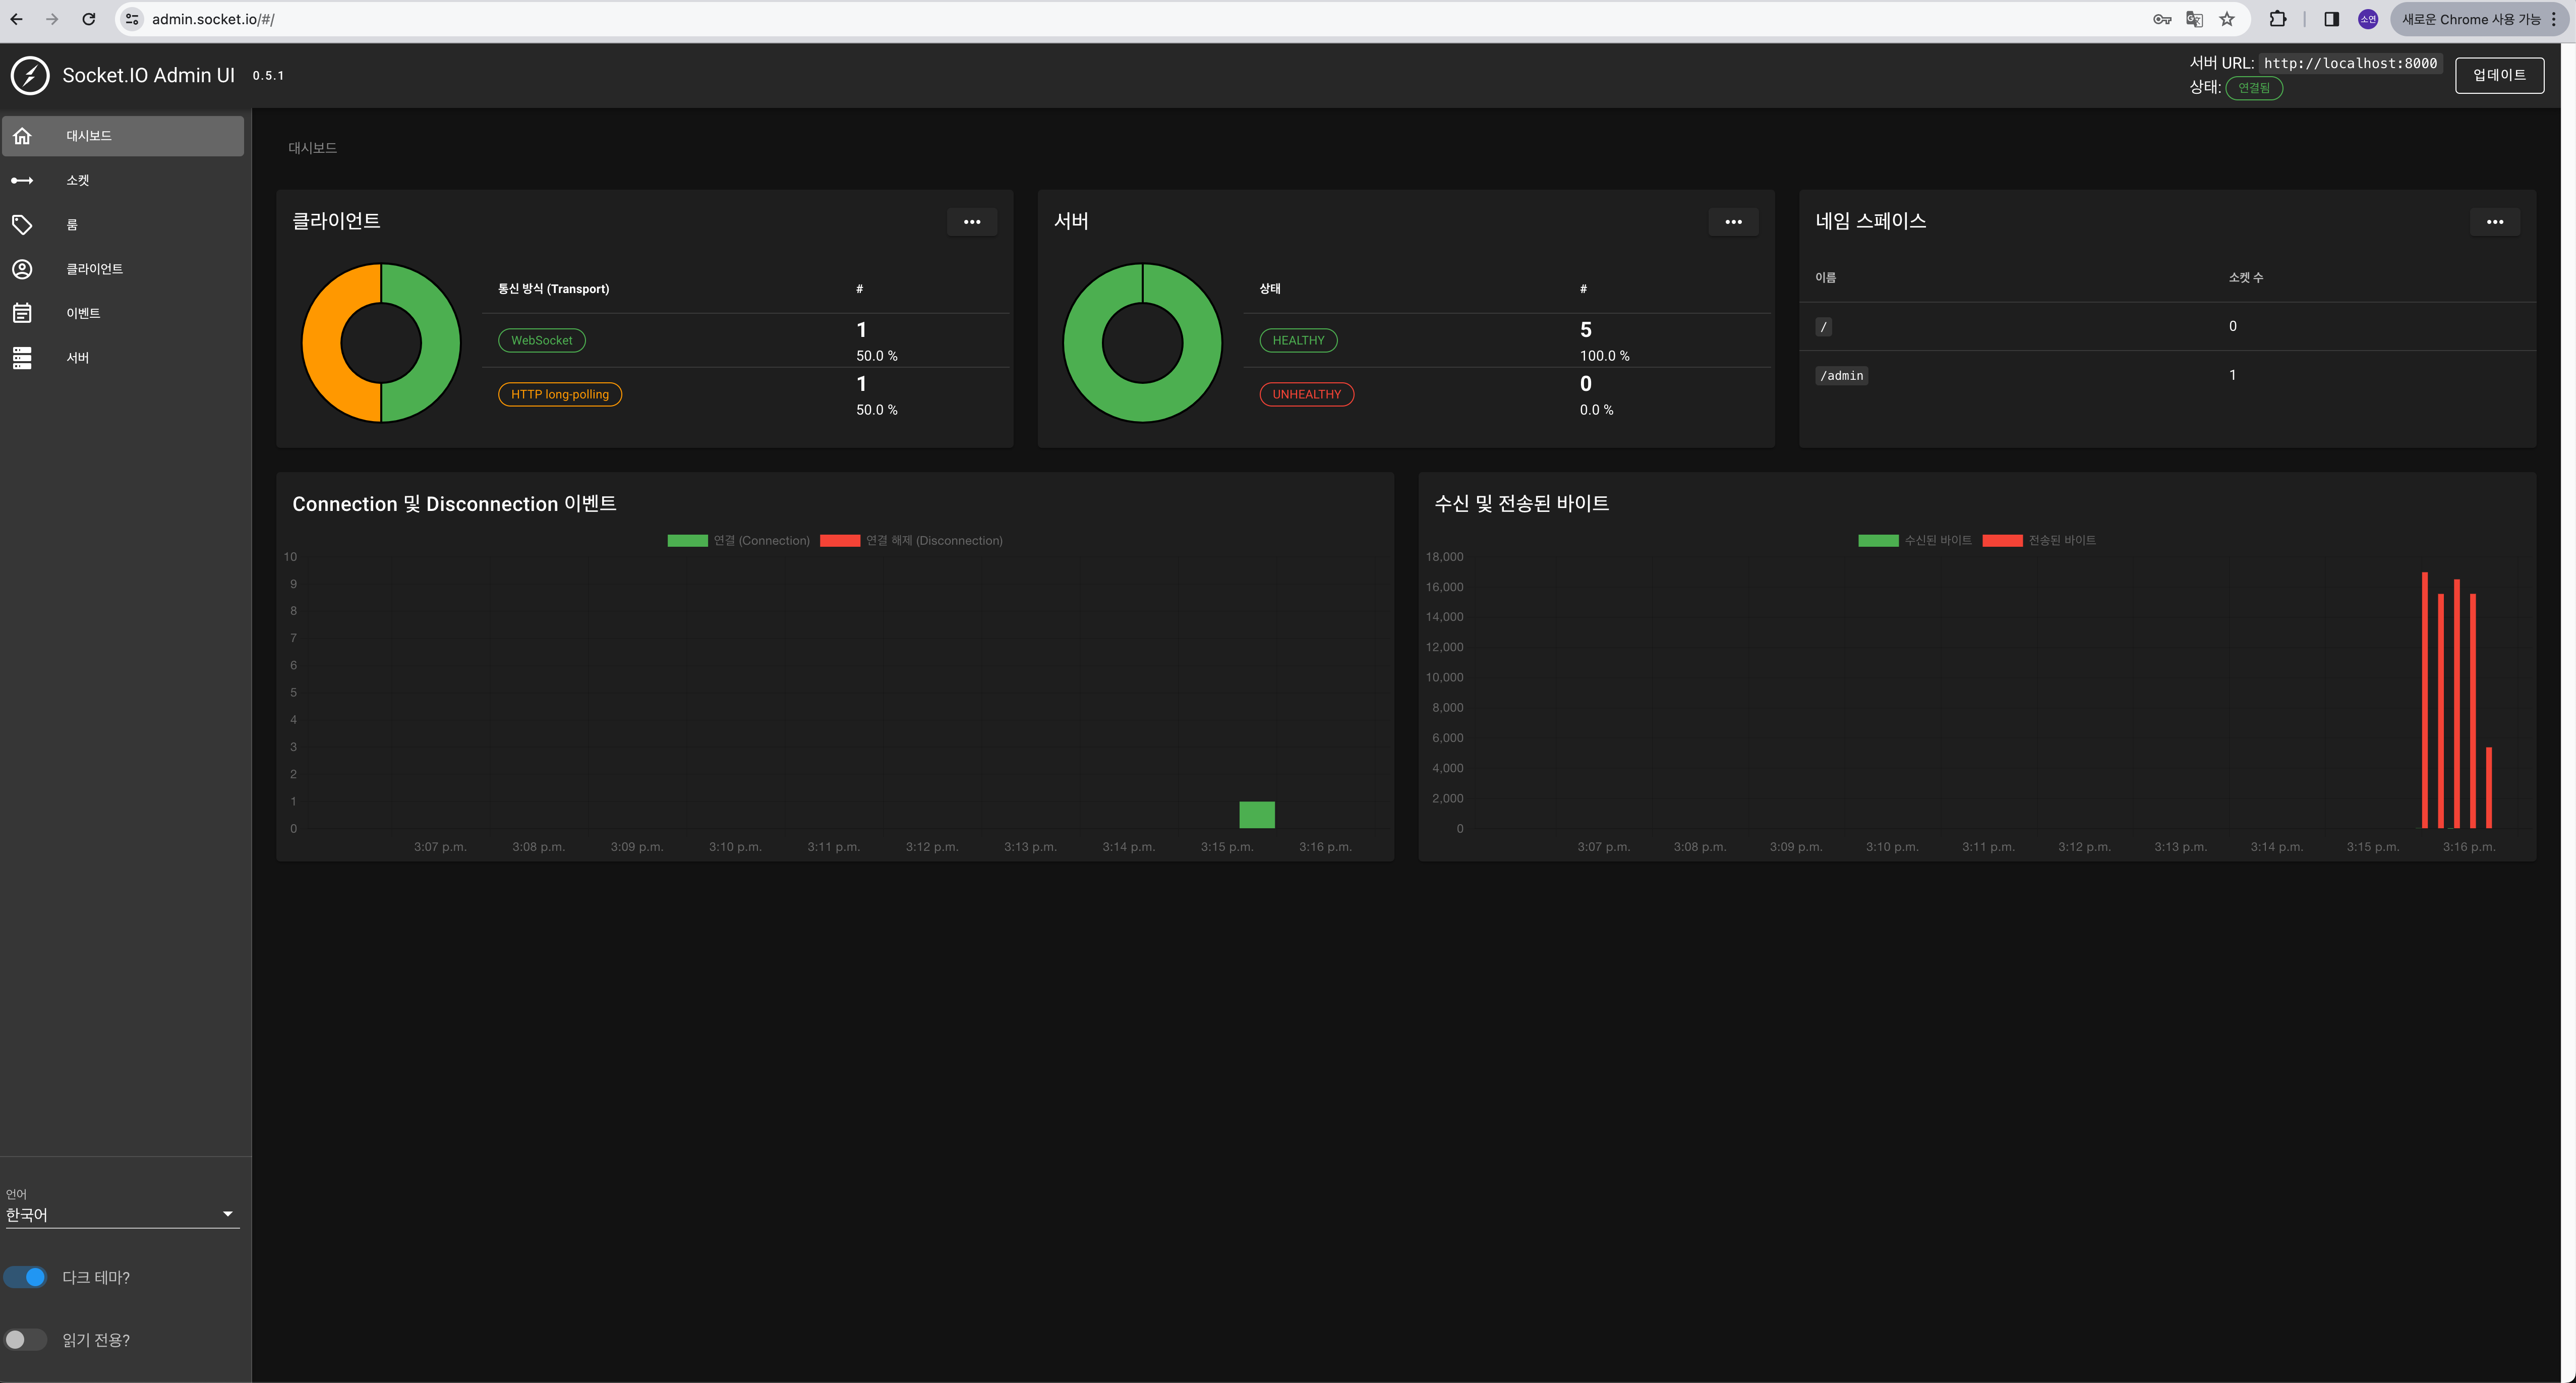
[FastAPI] SocketIO Admin UI
Socket.IO의 admin UI는 Socket.IO 서버의 상태를 실시간으로 모니터링할 수 있는 대시보드다.
실시간 통계
현재 연결된 클라이언트 수, 수신 및 전송된 이벤트 수, 데이터 트래픽 등의 통계
로그 뷰어
서버의 로그를 실시간으로 확인
이벤트 테스터
서버로 이벤트를 보내거나, 서버로부터 이벤트를 받는 것을 시뮬레이션
룸 뷰어
서버에 현재 존재하는 room과 그 방에 연결된 클라이언트 확인
인증
보안을 위한 인증 기능
인증된 사용자만이 Admin UI에 접근
# sockets.py
mgr = socketio.AsyncAioPikaManager('amqp://guest:guest@rabbitmq:5672/vhost')
sio_server = socketio.AsyncServer(
    async_mode = 'asgi',
    cors_allowed_origins=[
        'http://localhost:8000/ws',
        'https://admin.socket.io'
        ],
    client_manager=mgr
)

sio_server.instrument(auth={
    'username': 'admin',
    'password': 'admin',
})

sio_app = socketio.ASGIApp(
    socketio_server=sio_server,
    socketio_path='/ws/socket.io'
)
서버 설정에 admin을 추가한 후
https://admin.socket.io로 접속하면 된다.

설정에 맞게 접속하면 된다.
'WebFramework > [FastAPI]' 카테고리의 다른 글
| [FastAPI] Gunicorn threads 옵션 (0) | 2024.11.06 |
|---|---|
| [FastAPI] room 기능 구현 및 worker간 공유 (RabbitMQ) (0) | 2024.01.24 |
| [FastAPI] SocketIO 마운트해서 사용하기 (0) | 2024.01.24 |
| [FastAPI] BackgroundTasks, Celery (0) | 2024.01.09 |
| [FastAPI] 중첩된 JSON 모델(Nested JSON Models) 사용 (0) | 2023.09.25 |
[FastAPI] room 기능 구현 및 worker간 공유 (RabbitMQ)
room 기능을 구현해보자.
이전 글과 server.py는 변한게 없다.
# sockets.py
import socketio

sio_server = socketio.AsyncServer(
    async_mode = 'asgi',
    cors_allowed_origins=[]
)

sio_app = socketio.ASGIApp(
    socketio_server=sio_server,
    socketio_path='/ws/socket.io'
)

@sio_server.on('connect')
async def connect(sid, environ, auth):
    print(f'{sid}: connected')

@sio_server.on('enter_room')
async def begin_chat(sid, room):
    print(f'{sid}: enterd "{room}"')
    await sio_server.enter_room(sid, room)

@sio_server.on('exit_room')
async def exit_chat(sid, room):
    await sio_server.leave_room(sid, room)

@sio_server.on('disconnect')
async def disconnect(sid):
    print(f'{sid}: disconnected')
# client.py
import socketio
import asyncio
sio_client = socketio.AsyncClient()
@sio_client.event
async def connect():
print('I\'m connected')
await sio_client.emit('enter_room', 'my_room')
@sio_client.event
async def disconnect():
print('I\'m disconnected')
async def main():
await sio_client.connect(
url='http://localhost:8000/ws',
socketio_path='/ws/socket.io'
)
await sio_client.disconnect()
asyncio.run(main())터미널 세션 두 개를 열어 client를 두 명 만들어보자


FastAPI log를 확인해보면 sid가 다른 두 명의 클라이언트가 my_room 이라는 방에 들어왔다가 나간걸 확인할 수 있다.
클라이언트가 정말 같은 방에 있는지 확인하기 위해
서버에서 my_room에 있는 클라이언트들에게 메시지를 보내보자.
# socket.py
@sio_server.on('chat_message')
async def chat_message(sid, data):
message = data['message']
room = data['room']
print(f'{sid} in [{room}]: {message}')
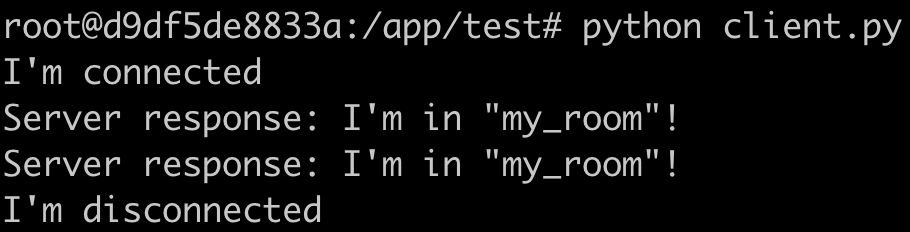
await sio_server.emit('server_response', message, room=room)# client.py
@sio_client.event
async def connect():
print('I\'m connected')
await sio_client.emit('enter_room', 'my_room')
await sio_client.emit('chat_message', {'room': 'my_room', 'message': 'I\'m in "my_room"!'})
@sio_client.event
async def server_response(data):
print('Server response:', data)
async def main():
await sio_client.connect(
url='http://localhost:8000/ws',
socketio_path='/ws/socket.io'
)
await asyncio.sleep(30)
await sio_client.disconnect()
서버에서 메시지를 보내는 로직을 추가하고
client 두 명을 테스트하기 위해 30초 sleep 또한 추가했다.


두 번째 client를 실행했을 때 첫 번째 client에 I'm in "my_room"!이 한 번 더 출력됨을 확인할 수 있다.
이렇게 원하는 room을 만들고 접속하여 room 안에 client들이 통신할 수 있다.
지금까지는
uvicorn server:app --host 0.0.0.0 --port 8000 --reload 처럼 FastAPI의 worker가 하나였다.
worker가 여러 개 띄우고 결과를 보자.
gunicorn -k uvicorn.workers.UvicornWorker -w 5 -b 0.0.0.0:8000 server:app --reload
gunicorn을 사용해 worker를 5개 띄우고 client 2개를 실행해보자.


첫 번째 실행한 client에 두 번째 client의 출력이 뜨지 않았다.
이유는 각각 독립적으로 실행되기 때문이다.
FastAPI의 워커를 여러 개 띄우면 각 워커는 고유한 프로세스로 실행된다.
이는 각 프로세스가 자체 메모리 공간을 가지고 독립적으로 실행된다는 것을 의미한다.
따라서, 각각의 워커는 고유한 Socket.IO 서버 인스턴스를 가지며, 트래픽은 운영체제에 의해 랜덤하게 워커로 할당된다.
이 인스턴스들은 서로의 상태를 공유하지 않는다.
이를 해결하기 위해 여러 워커 간의 상태를 공유할 수 있는 방법이 필요하다.
Socket.IO에는 이러한 환경을 위해 외부 메시지 브로커를 사용하는 방법이 있다.
메시지 브로커를 사용해 다른 워커/프로세스 간에 메시지를 중계할 수 있으며
이를 통해 모든 클라이언트가 동일한 my_room에 있는 것처럼 동작하게 할 수 있다.
외부 메시지 브로커로는 RabbitMQ를 사용하려고 한다.
# sockets.py
mgr = socketio.AsyncAioPikaManager('amqp://guest:guest@rabbitmq:5672/vhost')
sio_server = socketio.AsyncServer(
    async_mode = 'asgi',
    cors_allowed_origins=[],
    client_manager=mgr
)
aio-pika를 설치한 후
manager를 추가해주면 끝이다.
마찬가지로 worker를 5개 띄우고 client를 2개 띄워 RMQ와 함께 확인해보자.


첫 번째 실행한 client 출력에 두 번째 client의 출력이 보인다.
client 별로 FastAPI에서 처리되는 worker가 다르더라도 같은 my_room에서 메시지가 오고가고 있다.
Rabbit MQ 웹을 확인해보자.

socketio exchange가 생겼다.
이를 통해 room에 있는 client 모두에게 서버 메시지를 전송할 수 있는 것이다.
'WebFramework > [FastAPI]' 카테고리의 다른 글
| [FastAPI] Gunicorn threads 옵션 (0) | 2024.11.06 |
|---|---|
| [FastAPI] SocketIO Admin UI (0) | 2024.01.25 |
| [FastAPI] SocketIO 마운트해서 사용하기 (0) | 2024.01.24 |
| [FastAPI] BackgroundTasks, Celery (0) | 2024.01.09 |
| [FastAPI] 중첩된 JSON 모델(Nested JSON Models) 사용 (0) | 2023.09.25 |
[FastAPI] SocketIO 마운트해서 사용하기
"사용자 2명 : 챗봇" 을 구현하기 위해
room 기능을 제공하는 SocketIO를 사용하기로 했다.
SocketIO는 WebSocket을 기반으로 하는 라이브러리지만
WebSocket에만 의존하지 않고 필요한 경우 다른 전송 방법 (ex_폴링)을 사용할 수 있다.
또한 WebSocket보다 고급 기능을 제공한다.
챗봇 엔진은 FastAPI를 사용하기로 했다.
따라서 SocketIO를 FastAPI에 mount해서 사용해야 한다.
# sockets.py
import socketio

sio_server = socketio.AsyncServer(
    async_mode = 'asgi',
    cors_allowed_origins=[]
)

sio_app = socketio.ASGIApp(
    socketio_server=sio_server,
    socketio_path='/ws/socket.io'
)

@sio_server.on('connect')
async def connect(sid, environ, auth):
    print(f'{sid}: connected')

@sio_server.on('disconnect')
async def disconnect(sid):
    print(f'{sid}: disconnected')
# server.py
from fastapi import FastAPI
from sockets import sio_app
app = FastAPI()
@app.get('/')
async def home():
return {'message': 'Hello World'}
app.mount('/ws', app=sio_app)
FastAPI에서 mount는 특정 경로에 외부 WSGI 또는 ASGI 애플리케이션을 연결하는 기능을 의미한다.
즉, FastAPI 애플리케이션의 일부 경로를 외부 애플리케이션에 위임하는 것이다.
이를 통해 FastAPI 애플리케이션에서는 HTTP 요청을 처리하고
특정 경로에서는 외부 애플리케이션이 요청을 처리하도록할 수 있다.
위 코드는
모든 '/ws'로 시작하는 경로에 대한 WebSocket 요청을 외부 애플리케이션인 'sio_app'에 위임하여 처리하는 것이다.
여기서 주의할 점은 경로 설정이다.
SocketIO 앱 (socketio.ASGIApp)을 마운트할 때 사용하는 경로에 따라서 클라이언트에서 연결을 시도하는 경로가 달라질 수 있다.
app.mount('/ws', socketio.ASGIApp(sio))를 사용하면 클라이언트는 /ws/socket.io 경로로 연결 해야한다.
socketio.ASGIApp의 기본 socketio_path가 'socket.io'이기 때문이다.
참고로 python-socketio 라이브러리에서
@sio.on('event_name')와 @sio.event는 동일한 기능이다.
두 가지 방식으로 이벤트 핸들러를 등록할 수 있으며
단지, @sio.on('event_name')방식은 이벤트 이름을 명시적으로 지정하는 반면
@sio.event방식은 핸들러 함수의 이름을 이벤트 이름으로 사용한다.


테스트를 위해 Postman을 사용했지만 제대로 동작하지 않았다.
문서에서 제공하는 python-socketio[asyncio_client]를 사용해 클라이언트를 생성했다.
# client.py
import socketio
import asyncio

sio_client = socketio.AsyncClient()

@sio_client.event
async def connect():
    print('I\'m connected')

@sio_client.event
async def disconnect():
    print('I\'m disconnected')

async def main():
    await sio_client.connect(
        url='http://localhost:8000/ws',
        socketio_path='/ws/socket.io'
    )
    await sio_client.disconnect()

asyncio.run(main())
FastAPI를 실행하자
uvicorn server:app --host 0.0.0.0 --port 8000 --reload
이후 client를 실행하면 아래와 같다.


다음 글은 room 기능 구현!
'WebFramework > [FastAPI]' 카테고리의 다른 글
| [FastAPI] SocketIO Admin UI (0) | 2024.01.25 |
|---|---|
| [FastAPI] room 기능 구현 및 worker간 공유 (RabbitMQ) (0) | 2024.01.24 |
| [FastAPI] BackgroundTasks, Celery (0) | 2024.01.09 |
| [FastAPI] 중첩된 JSON 모델(Nested JSON Models) 사용 (0) | 2023.09.25 |
| [FastAPI] SQLAlchemy 요소 (0) | 2023.08.08 |
[FastAPI] BackgroundTasks, Celery
BackgroundTasks
사용자가 데이터를 요청하고, 서버가 이 데이터를 처리하는 데 시간이 걸리는 경우,
서버는 먼저 HTTP 응답을 반환하고, 그 후에 백그라운드에서 데이터 처리를 계속할 수 있다.
이렇게 하면 사용자는 서버의 응답을 빠르게 받을 수 있다.
예시 코드를 보자.
from fastapi import BackgroundTasks, FastAPI

app = FastAPI()

def write_log(message: str):
    with open("log.txt", "a") as file:
        file.write(message)

@app.post("/send/{message}")
async def send_message(background_tasks: BackgroundTasks, message: str):
    background_tasks.add_task(write_log, message)
    return {"message": "Message received"}
FastAPI는 본질적으로 비동기 프레임워크다.
Starlette(비동기 웹 프레임워크) 위에 구축되어 있으며,
따라서 Python의 async와 await 키워드를 사용하여 동시에 여러 요청을 처리할 수 있다.
FastAPI의 BackgroundTasks는 각 작업을 별도의 스레드에서 실행한다.
즉, BackgroundTasks.add_task() 메소드에 전달된 함수는 메인 스레드(=HTTP 요청을 처리하는 스레드)와는
별도의 스레드에서 실행된다.
이렇게 하면, 메인 스레드는 블로킹되지 않고(=I/O작업이 완료되기를 기다리지 않고) 다른 요청을 계속 처리할 수 있다.
하지만
복잡한 계산이나 작업을 수행하는 경우 동일한 프로세스의 일부로 실행하지 않는 것이 좋다.
따라서 이러한 복잡한 작업을 별도의 프로세스로 수행하려면 celery를 사용하면 된다.
celery
파이썬에서 사용하는 비동기 작업 큐/작업 스케줄링 시스템이다.
메시지 브로커를 통해 메시지를 전달하고, 작업자(worker) 프로세스가 이 메시지(일반적으로 작업 또는 태스크)를 가져와서 처리한다.
- 시간이 오래 걸리는 작업을 백그라운드에서 처리해야 할 때
- 많은 양의 작업을 병렬로 처리해야 할 때
- 정기적으로 반복되는 작업을 스케줄링해야 할 때
주요 구성 요소
- Producer: 작업을 만들고 메시지 브로커에 전송하는 파트입니다. 일반적으로 웹 애플리케이션에서 요청을 처리하는 동안 작업을 생성하고 큐에 넣습니다.
- Broker: 작업 메시지를 큐에 보관하고, 작업자에게 전달하는 중개자 역할을 합니다. RabbitMQ, Redis 등 다양한 메시지 브로커를 사용할 수 있습니다.
- Worker: 실제로 작업을 처리하는 프로세스입니다. 브로커로부터 작업 메시지를 받아 처리하고 결과를 저장합니다.
- Backend: 작업의 결과를 저장하는 곳입니다. 이는 선택 사항이며, 작업의 결과를 추적하거나, 작업이 성공적으로 완료되었는지 확인하려는 경우에 사용됩니다.
celery는 이런 구조를 통해 큰 규모의 분산 작업 처리를 가능하게 한다.
병렬 처리, 작업 우선 순위, 스케줄링 등 다양한 기능을 제공하며
신뢰성있는 작업 처리를 위한 실패 시 재시도, 작업 결과 추적 등의 기능도 제공하다.
FasAPI, Celery, RMQ 예제
https://medium.com/cuddle-ai/async-architecture-with-fastapi-celery-and-rabbitmq-c7d029030377
Async Architecture with FastAPI, Celery, and RabbitMQ
In one of my earlier tutorials, we have seen how we can optimize the performance of a FastAPI application using Async IO. To know more you…
medium.com
BackgroundTask와 Celery는 모두 비동기 작업을 처리하는 데 사용되지만
차이점은 아래와 같다.
BackgroundTasks
동일한 프로세스 내에서 별도의 스레드에서 실행되며, 작업이 완료 될 때까지 메인 스레드의 실행을 차단하지 않는다.
그러나 Python의 Global Interpreter Lock(GIL) 때문에
CPU-bound 작업에서는 이 방식이 큰 성능 향상을 가져오지 못할 수 있다.
Celery
별도의 작업자(worker) 프로세스에서 비동기 작업을 처리하는데 사용된다.
이는 메시지 브로커를 통해 메인 애플리케이션과 작업자 프로세스 간에 작업을 전달한다.
따라서 복잡하거나 시간이 오래 걸리는 작업, 또는 대량의 작업을 병렬로 처리하는데 적합하다.
또한 각 작업자 프로세스는 독립적으로 실행되므로, GIL에 의한 제한을 받지 않는다.
결국 BackgroundTasks는 간단하고 빠른 작업에 적합하고,
Celery는 복잡하거나 오래 걸리는 작업에 적합하다.
'WebFramework > [FastAPI]' 카테고리의 다른 글
| [FastAPI] room 기능 구현 및 worker간 공유 (RabbitMQ) (0) | 2024.01.24 |
|---|---|
| [FastAPI] SocketIO 마운트해서 사용하기 (0) | 2024.01.24 |
| [FastAPI] 중첩된 JSON 모델(Nested JSON Models) 사용 (0) | 2023.09.25 |
| [FastAPI] SQLAlchemy 요소 (0) | 2023.08.08 |
| [wsl] 파이썬 가상환경 진입 bash 사용 (0) | 2023.03.10 |
[FastAPI] 중첩된 JSON 모델(Nested JSON Models) 사용
class ListStr(BaseModel):
    strings: List[str]

@app.post('/listTest')
def listTest(strings_input:ListStr):
    s = strings_input.strings
ListStr 모델의 요청 데이터가 바로 JSON 배열
- Fastapi가 'strings'필드에 매핑
- 따라서 'strings'필드에 대한 리스트로 데이터를 사용할 수 있음
# 요청 JSON
{
    "strings": ["문자열1", "문자열2", "문자열3"]
}
class ListStr(BaseModel):
    strings: List[str]

class OtherOptions(BaseModel):
    a: Optional[str]
    b: Optional[float]

@app.post('/listTest')
def listTest(strings_input:ListStr, other_input:OtherOptions):
    s = strings_input.strings
    o = other_input
잘못된 JSON 요청
- 'ListStr' 모델과 'OtherOptions'모델을 동시에 사용
- 'strings_input'와 'other_input'는 두 개의 서로 다른 JSON 객체
- 'strings_input'는 'strings' 필드 하나를 가지고 있는 JSON 객체이며,
'OptherOptions'는 'a', 'b' 필드를 가지고 있는 JSON 객체
# 요청 JSON
{
    "strings_input": ["문자열1", "문자열2", "문자열3"],
    "other_input":{"a":"a", "b":2}
}올바른 JSON 요청
- FastAPI는 이러한 JSON 객체의 구조를 정확하게 매핑하기 위해 모델을 사용함
- 따라서 'strings_input'과 'other_option'을 각각의 모델에 매핑하려면 요청 데이터를 해당 구조에 따라 정확하게 구성해야 함
- 'strings_input'과 'other_option'을 JSON 객체로 감싸서 전달해야 함
- 이렇게 하면 FastAPI가 요청 데이터를 'ListStr'과 'OtherOptions' 모델에 각각 매핑할 수 있음
# 요청 JSON
{
    "strings_input": {
        "strings":["문자열1", "문자열2", "문자열3"]
    },
    "other_option": {
        "a": "a",
        "b": 2
    }
}'WebFramework > [FastAPI]' 카테고리의 다른 글
| [FastAPI] room 기능 구현 및 worker간 공유 (RabbitMQ) (0) | 2024.01.24 |
|---|---|
| [FastAPI] SocketIO 마운트해서 사용하기 (0) | 2024.01.24 |
| [FastAPI] BackgroundTasks, Celery (0) | 2024.01.09 |
| [FastAPI] SQLAlchemy 요소 (0) | 2023.08.08 |
| [wsl] 파이썬 가상환경 진입 bash 사용 (0) | 2023.03.10 |
[FastAPI] SQLAlchemy 요소
💡 create_engine
SQLAlchemy에서 데이터베이스와의 연결을 설정하고 엔진 생성
데이터베이스의 종류와 위치, 사용자 인증 정보 등을 포함하여 연결에 필요한 정보를 제공
💡 sessionmaker
세션은 데이터베이스와의 상호작용을 추적하고 제어하는 데 사용됨
sessionmaker는 세션 객체를 생성하는 팩토리를 생성하는 역할을 함
sessionmaker를 사용하여 데이터베이스 세션을 생성하면 해당 세션을 통해 데이터베이스와의 작업을 수행할 수 있음
* 팩토리 메서드 *
객체 생성을 캡술화하는 디자인 패턴 중 하나
SQLAlchemy에서 sessionmaker()는 세션 객체를 생성하는 펙토리 메서드 역할
💡 session
실제 데이터베이스와의 상호작용을 담당하는 객체
sessionmaker를 사용하여 생성된 세션 팩토리를 통해 세션을 생성하고,
세션을 통해 데이터의 조회, 추가, 수정, 삭제 등의 작업을 수행할 수 있음
1. 팩토리 생성
from sqlalchemy import create_engine
from sqlalchemy.orm import sessionmaker

# 데이터베이스 연결 정보
DATABASE_URL = "sqlite:///./test.db"

# 엔진 생성
engine = create_engine(DATABASE_URL)

# 팩토리 생성
SessionLocal = sessionmaker(autocommit=False, autoflush=False, bind=engine)
2. 세션 객체 생성 및 사용
from sqlalchemy.orm import Session
from fastapi import FastAPI, Depends

app = FastAPI()

# 팩토리 메서드(SessionLocal)를 호출하여 세션 객체 생성
def get_db():
    db = SessionLocal()
    try:
    	# 세션 객체를 리소스로서 제공
        yield db
    finally:
        db.close()

@app.post("/items/")
async def create_item(item: Item, db: Session = Depends(get_db)):
    # db 사용하여 작업 수행
    db.add(item)
    db.commit()
    db.refresh(item)
    return item
get_db()
Depends(get_db)를 사용하여 의존성을 주입하면, FastAPI가 세션을 관리하며 요청 핸들러에서 사용할 수 있도록 해줌
세션 객체를 리소스로서 제공한다는 것은
세션 객체를 필요로 하는 함수나 메서드에서 세션을 쉽게 사용할 수 있도록 관리하는 것을 의미
세션 객체는 데이터베이스와의 연결을 나타내는 중요한 자원
그렇기 때문에 세션을 생성하고 닫는 과정을 중복해서 처리하지 않고,
필요한 곳에서 쉽게 사용할 수 있도록 만드는 것이 좋음
리소스로서 제공된 세션 객체는 필요한 작업을 수행한 뒤에는 자동으로 정리되어 닫히게 됨
이를 통해 개발자는 세션 관리에 대한 복잡한 작업을 최소화하고,
안전하고 효율적인 데이터베이스 작업을 수행할 수 있음
'WebFramework > [FastAPI]' 카테고리의 다른 글
| [FastAPI] room 기능 구현 및 worker간 공유 (RabbitMQ) (0) | 2024.01.24 |
|---|---|
| [FastAPI] SocketIO 마운트해서 사용하기 (0) | 2024.01.24 |
| [FastAPI] BackgroundTasks, Celery (0) | 2024.01.09 |
| [FastAPI] 중첩된 JSON 모델(Nested JSON Models) 사용 (0) | 2023.09.25 |
| [wsl] 파이썬 가상환경 진입 bash 사용 (0) | 2023.03.10 |
[wsl] 파이썬 가상환경 진입 bash 사용
배치 파일 (window), 쉘 스크립트 (linux)
- 여러 명령어를 한 번에 실행해 주는 파일
sudo apt-get update
sudo apt-get install python3-pip
sudo apt install python3-virtualenv
이 때 pip3 install virtualenv로 설치했다면 충돌
pip3로 설치한 걸 삭제해야 됨 ( pip uninstall virtualenv )
가상환경 생성
virtualenv 가상환경 이름
가상환경 진입
source /mnt/d/FastAPI/가상환경이름/bin/activate
위 명령어를 쉘 스크립트로 간편하게 사용하고자 한다.
(윈도우의 경우 https://wikidocs.net/175831 참고)
- vi ~/.bashrc

- source .bashrc
- 이후 myapi로 가상환경 집입 가능
'WebFramework > [FastAPI]' 카테고리의 다른 글
| [FastAPI] room 기능 구현 및 worker간 공유 (RabbitMQ) (0) | 2024.01.24 |
|---|---|
| [FastAPI] SocketIO 마운트해서 사용하기 (0) | 2024.01.24 |
| [FastAPI] BackgroundTasks, Celery (0) | 2024.01.09 |
| [FastAPI] 중첩된 JSON 모델(Nested JSON Models) 사용 (0) | 2023.09.25 |
| [FastAPI] SQLAlchemy 요소 (0) | 2023.08.08 |